
 25% Off Sitewide | Summer Sale | Code: Summer25
25% Off Sitewide | Summer Sale | Code: Summer25
Conquer that hill and grin big as you activate your new super powers! The compact & lightweight 250W motor provides a top speed of 16 mph at the push of a button. New features this year include an easy to remove water bottle battery, a battery lock, disc brake compatible hub, a USB charging port for your phone, a thumb throttle that allows you to control how much power the motor gives you, a higher efficiency Hilltopper motor that gives more torque for energy used, and an upgrade to 36 volts. This is the original Hilltopper that started the e-bike revolution, updated for 2024. Rugged. Simple. Awesome!
Install it like this

Your wheel is customized to fit the wheel size of your bike. Stainless steel spokes are combined with a double wall rim. Nylon rim tape provides extra protection against flats. A complementary Kenda tire & tube is included to make installation easy (and save you money). The wheel is compatible with rim and disc brakes to give you as many options as possible.
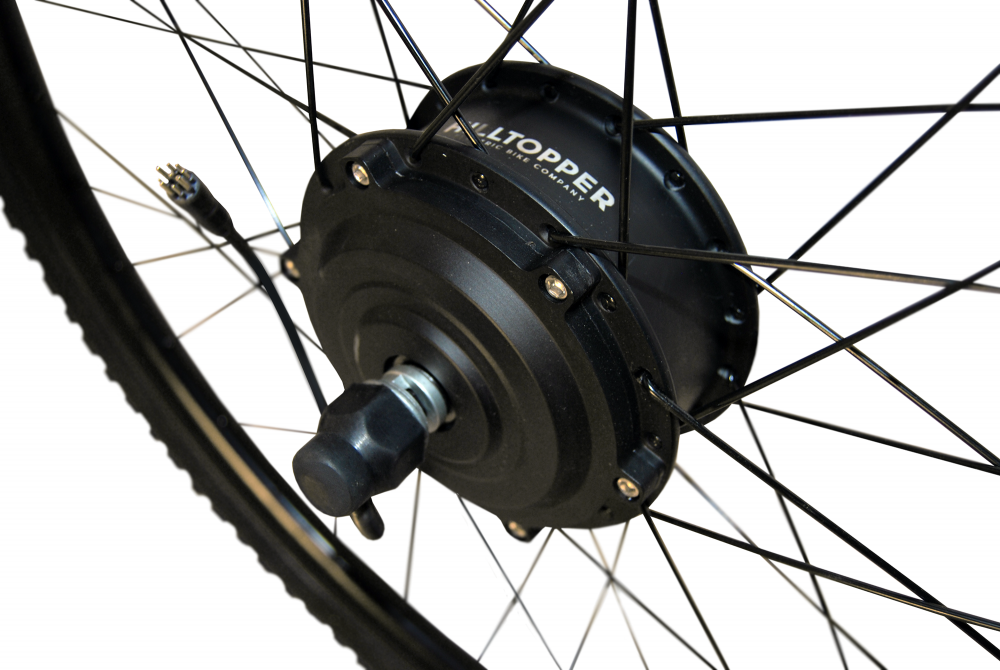
At the center of things is a 36V Hilltopper 250 Watt Electric Motor in black. Small & compact with a high torque to size ratio, this motor provides a 18 mph top speed and higher with pedaling. Torque roughly doubles the average persons pedal power. Hilltopper motors are legendary for their long lifespan, typically outlasting your bike.
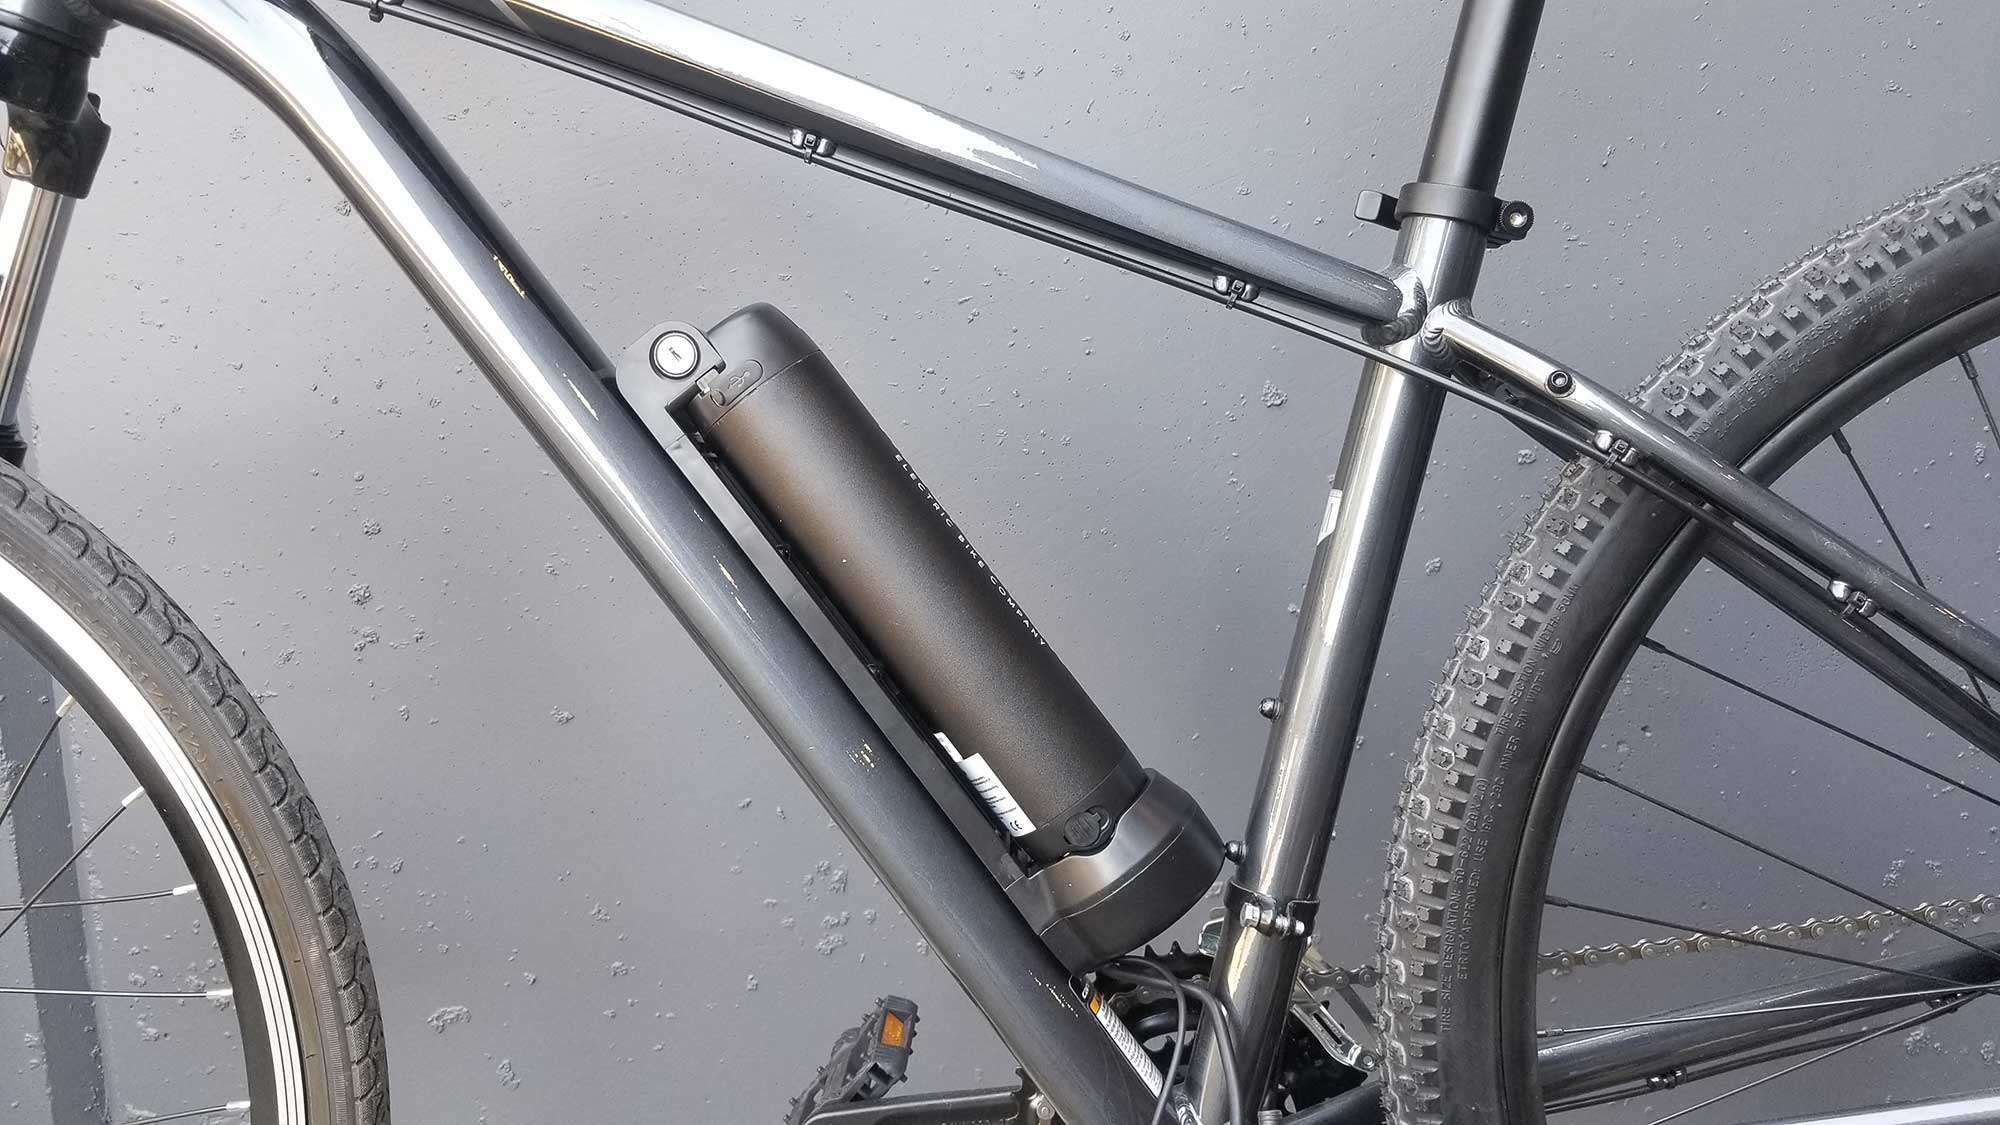
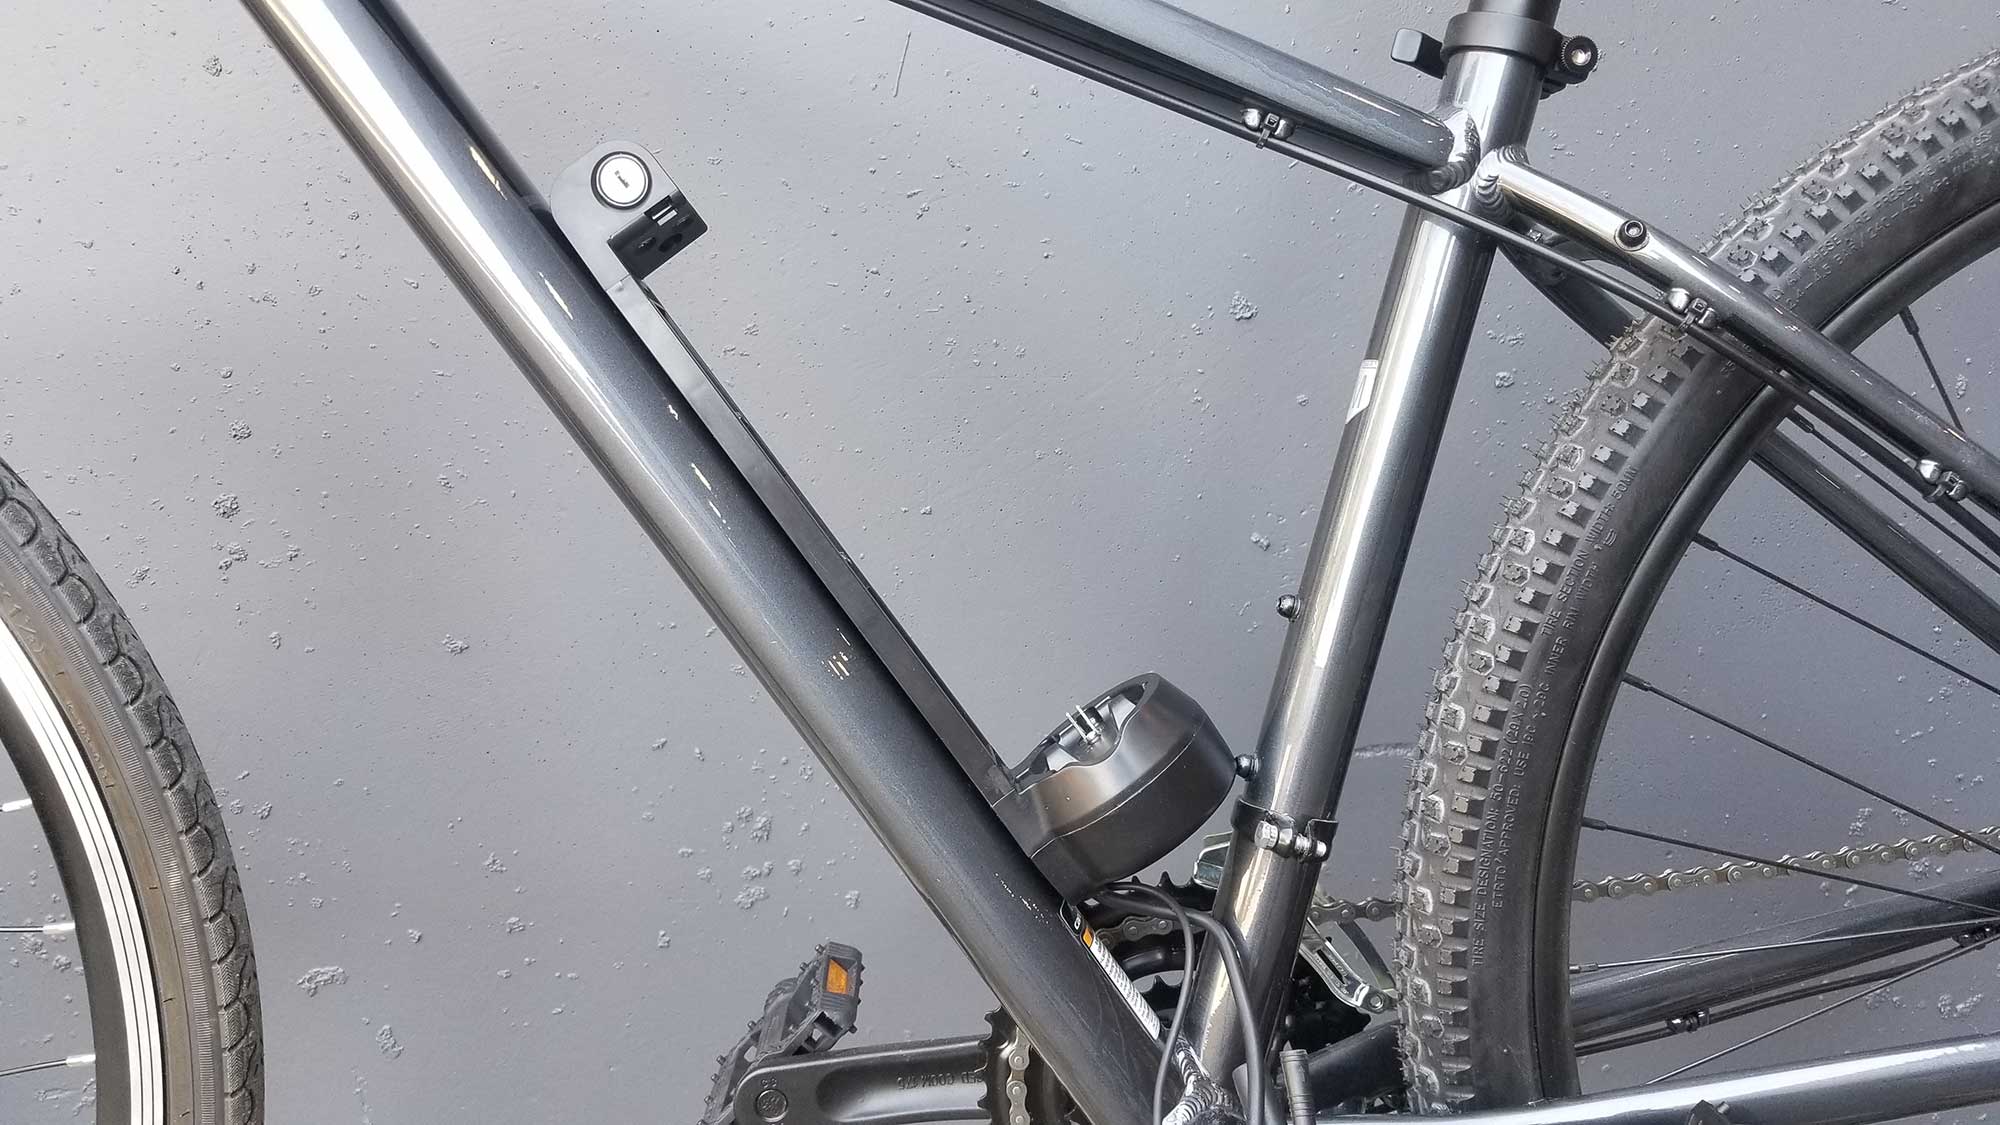
Motor is powered by a 36V 5.4 Ah Lithium Ion battery in a beautiful, durable, and easy to install aluminum case. Range of 12-16+ miles depending on how much you pedal and the terrain. Battery has input connection for the lithium battery charger (included). Black rubber button turns the battery on/off. This battery fits just about any bike, oddball, or oddity. It's small profile and simplicity of design makes the Sprinter our most lightweight kit.
Activates your super powers and allows you to control how much assist the motor gives you. Fits most handlebars (hybrid, mountain, cruiser, etc.). For drop bars (found on road bikes) please see FAQ for fit. Installs by sliding on, you must remove your grips first to install. Very easy to use and long lasting.
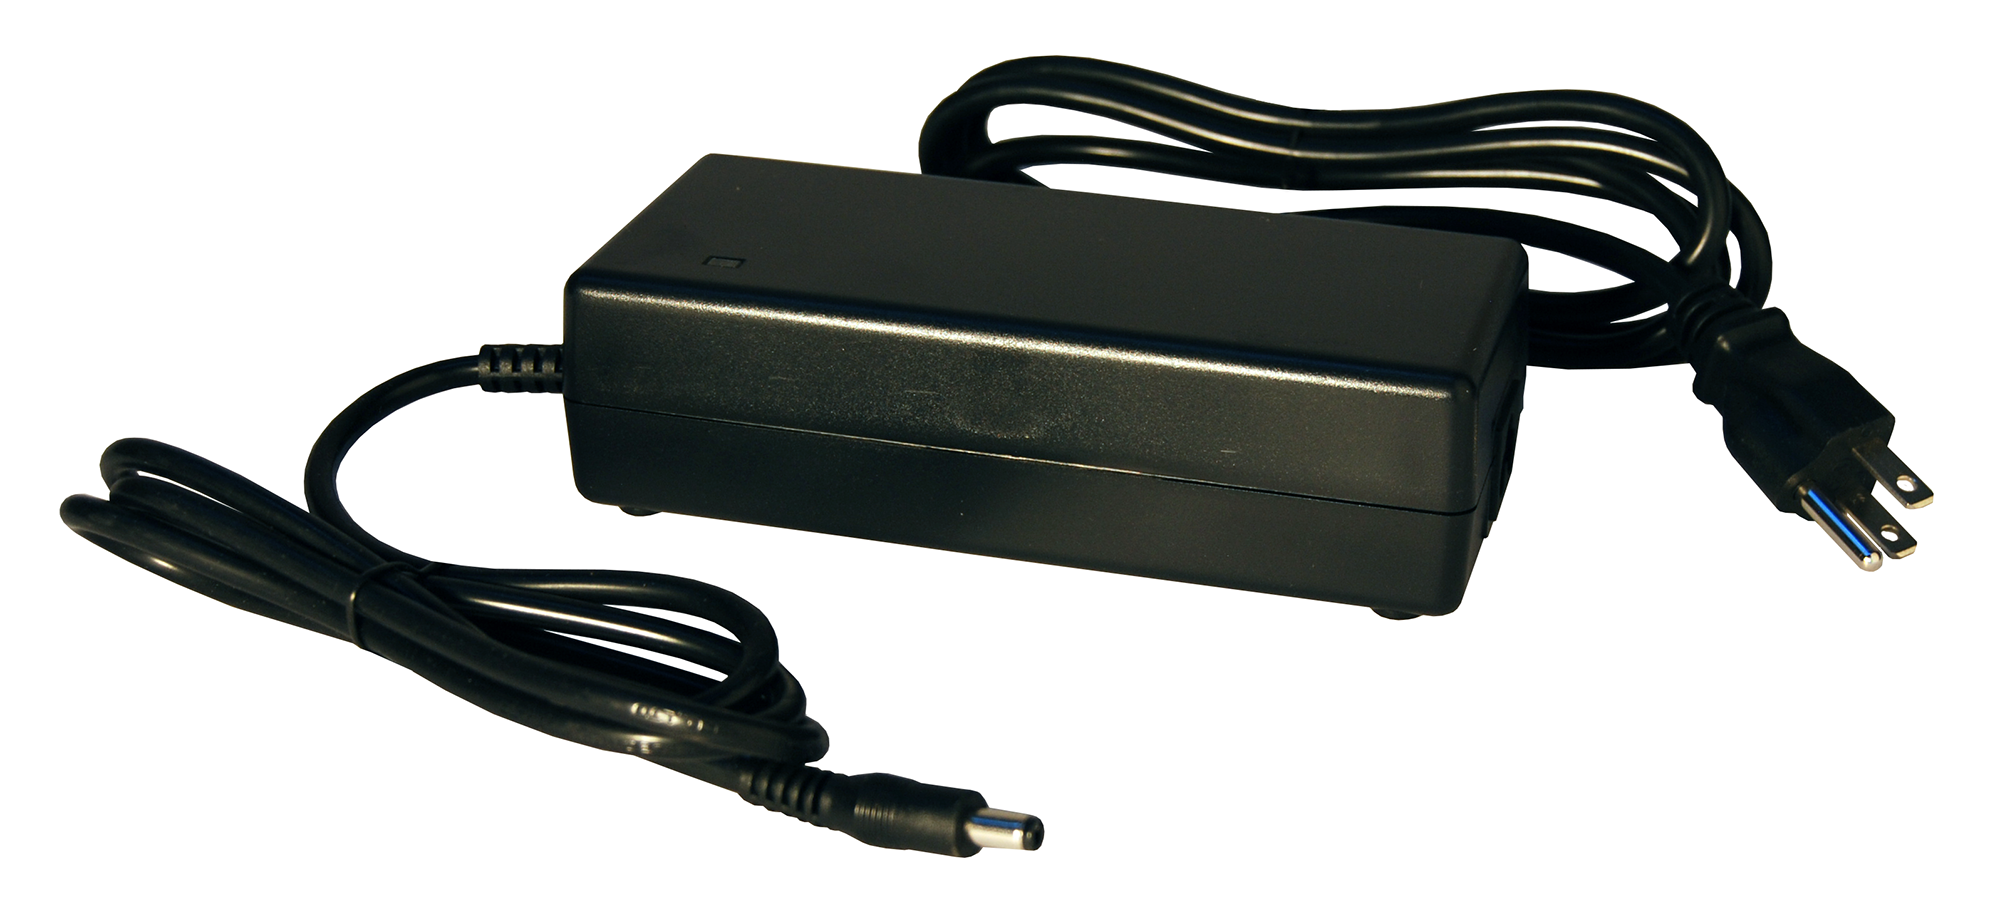
Charges your 36V battery in <3 hours. Optimized for Lithium-Ion chemistry, this charger ensures a long lifespan for your battery.
Battery holder installs on a water bottle cage mount on your downtube, or can be held in a basket, bag, or wherever else you would like to put it on your bike. The controller is built into the base of the battery holder and controls the motor. Your controller gives you steady power, and is designed for maximum efficiency, giving you a longer range for the size of the battery. The controller is limited at 20 mph to meet US e-bike regulations. Of the many features of this controller that we love, the traction control is pretty rad, it limits how much the wheel will slip or spin on gravel or wet leaves. Helpful for all season use, and wet roads.
Independent Review
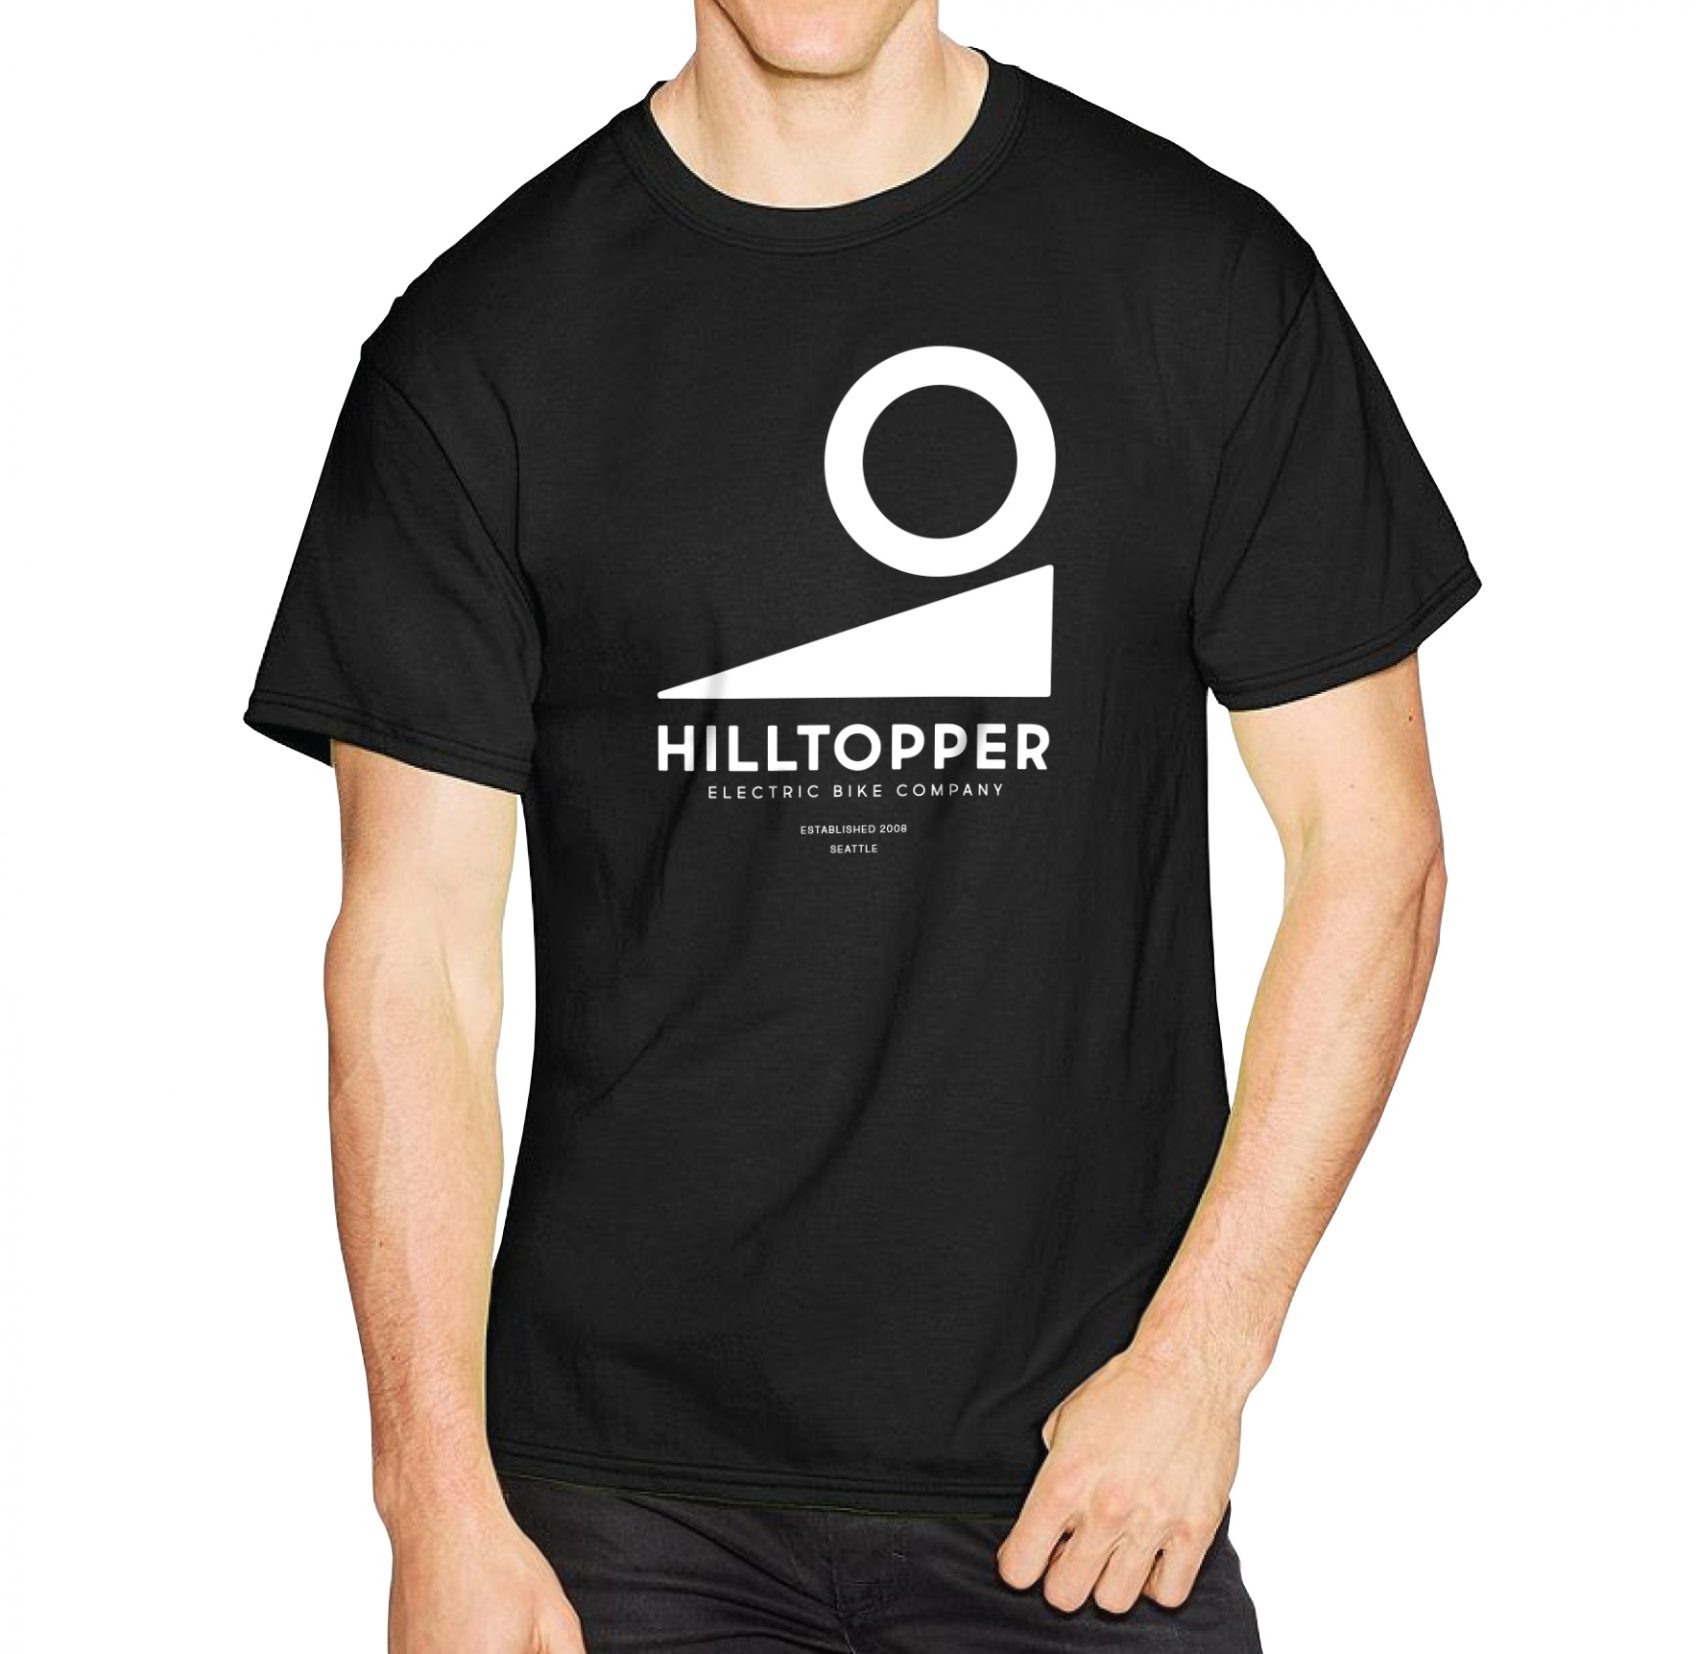
Seattle Born & Bred since 2008.
Rugged & versatile kit for people who want a boost on their ride. For riders who want more power we recommend the Ranger, Horizon, or Summit.
Performs best as added power to your pedaling. Great for people who love to ride bikes but want to flatten out the hills and cruise at a higher speed.
Cuts your commute time by 25% and how much you pay for parking or Uber by 100%.
Fits most bikes & adult trikes. Minimalist design gives hidden super powers appeal (folks can't tell its an e-bike).
Looking to find out if your kit is compatible with our Universal Replacement Battery set up? Click the link below to view our compatibility cheat sheet!
Hilltopper URB Compatibility Cheat Sheet
If you have any further questions, please contact Support@HilltopperBikes.com.
Having trouble with your PAS sensor? Wondering if it will fit your bike before you place an order? To dot your i's and dash your t's, click the link below for a detailed over view of our PAS sensor.
Video Instructions - Installing the Pedal Assist System
Our 36V Horizon kits and our 48V Summit kits both include the PAS as a fully optional component. For complete Horizon installation instructions check the next link:
Horizon Kit installation instructions ver 2021A
For complete Summit installation instructions click below:
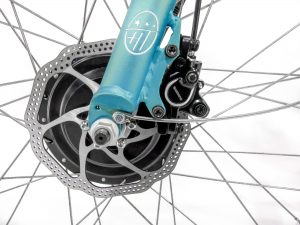
Yes, all Hilltopper wheels are disc brake compatible with standard spacing and 6-bolt rotor attachment.
All of our wheels are also rim brake compatible giving you the most options to fit your bike!
For instructions on how to install a rotor on your new Hilltopper, check out the following video:
Why are Hilltopper Bikes 1/2 the price of other e-bikes on the market? Because we sell direct to you, the customer. Our mission is to create a sustainable future, two wheels at a time and we do that by making e-bikes affordable for you. We intentionally don't sell through dealers, distributors, or retailers because that way of selling means a higher price tag for you. We build our kits and bike wheels with love and care here in Seattle and sell direct to you, so you won't see the large retail markup that would be present if you were buying from a third party. That way you're always getting the best deal on your electric bike.
It depends on how fast you want to go, and how steep the hill.
The 36v, 350 watt kits and bikes can go 20 mph with minimal pedaling. This is the legal limit in most of the US for e-bikes so it's enough power for most bikes. This is a great power for steeper hills, faster commutes & carrying bigger loads. It's like having two Soul Cycle instructors also pedaling for you.
The 36v, 250 watt Sprinter kit can go 16 mph with minimal pedaling on flat ground, but they perform best as a boost to your pedaling with pedaling required on hills. Perfect if you are looking for an added boost to your ride at an affordable price. Cuts your commute time by 25%, flattens out that hill by 50% & puts a smile on your face.
The 48v, 750 watt Summit kit can go 20 mph with minimal pedaling. This is the legal limit in most of the US for e-bikes. The motor could go faster, but it is limited at 20 mph for safety and to remain street legal in the US (unlimited it could go 30+ mph). The 750 watt motor can carry large loads up steep hills and accelerates quickly. Perfect if you are looking to cruise consistently at 20 mph over varied terrain or climb absurdly steep and long hills while hauling groceries. It's more power then you might need. But its a lot of fun and gives you the piece of mind that you can accelerate out of any sticky situation.
All Hilltopper electric bikes and kits have a maximum speed of 20 mph. This keeps them street legal and compliant with state laws and city ordinances in the US.
For choosing a power system, here's what to keep in mind:
The 36v, 350 watt kits (Horizon) can go 20 mph with minimal pedaling. This is great for steeper hills, faster commutes & carrying bigger loads.
The 36v, 250 watt kits (Sprinter) can go 15 mph with minimal pedaling on flat ground, but they perform best as a boost to your pedaling with pedaling required on hills. Perfect if you are looking for an added boost to your ride at an affordable price. Cuts your commute time by 25%, gives a boost up hills & puts a smile on your face.
There are many different types of bicycles and adult tricycles in the world today, but each Hilltopper conversion kit has been carefully designed to fit as many of these models as possible. All Hilltopper wheels are designed to be compatible with both rim brakes and disc brakes.
There are a few more factors used to confirm that the Hilltopper will fit your bike. 1) Wheel Size. 2) Hub and Fork spacing. 3) Fork Dropout Type. See FAQ Will It Fit My Bike? for more information.
Please contact support@HilltopperBikes.com to initiate a return.
Return address:
Please be sure to include a note with your items that has your name, email address, phone number, order number, and why you are returning it. Without this information, we are unable to process your return.
Hilltopper Bikes
Technical Support Team Attn: (Order Number)
225 S Lucile St.
Seattle, WA 98108
USA
The 2021+ 48 V Summit HillTopper electric bike conversion kit is our top tier kit. This kit offers the highest amount of power and miles. The downtube battery keeps a sleek look, it has USB to charge your phone, plus a lock to keep your battery safe and secure. On top of all that we've added a new Pedal Assist Sensor and LCD screen as a bonus feature.
Here are the basic steps you'll need to follow:
And that's it, easy!
Click here for PDF instructions or, better yet, follow this link for a video walkthrough of the installation.
Having trouble with your PAS sensor? Wondering if it will fit your bike before you place an order? To dot your i's and dash your t's, click the link below for a detailed over view of our PAS sensor.
Video Instructions - Installing the Pedal Assist System
Our 36V Horizon kits and our 48V Summit kits both include the PAS as a fully optional component. For complete Horizon installation instructions check the next link:
Horizon Kit installation instructions ver 2021A
For complete Summit installation instructions click below:
Our variable speed throttle is just one piece of our kits that allows the rider to control the amount of power fed to the motor - kind of like a gas pedal!
The throttle is a versatile piece that can be installed on your handlebars and adjusted to whatever suits you and your bicycle best. We recommend putting the throttle on the left, placing them between the handlebar grip and the brake/shifter levers.
The most common type of handlebars on the market today would be a flat or riser handlebar. Our throttle is specifically made to match these handlebars with its 22.2mm grip diameter.
While the throttle grip is too small to fit most road bikes, drop bars, and any other handlebars with uncommon geometries, there is a pretty simple workaround - a handle bob (a quick Google search should get you plenty of result) can be attached to any of these handlebars for a quick and easy install.
Check out our video on how to install the variable speed throttle!
The 2021+ 36 V Horizon HillTopper electric bike conversion kit is another step up from our Sprinter kits. This kit offers higher power and more miles. The downtube battery keeps a sleek look, it has USB to charge your phone, plus a lock to keep your battery safe and secure. On top of all that we've added a new Pedal Assist Sensor as a bonus feature.
Here are the basic steps you'll need to follow:
And that's it, easy!
Click here for PDF instructions or, better yet, follow this link for a video walkthrough of the installation.
The 2021 36 V Sprinter Hilltopper electric bike conversion kit is a big step up from our original systems both in tech and performance. The higher voltage offers more power and efficiency while the bottle battery gives you a sleeker look, USB to charge your phone, plus a lock to keep your battery safe and secure. On top of all that the new throttle offers a bit more control.
Here are the basic steps you'll need to follow:
And that's it, easy!
Click here for detailed PDF instructions!
All HillTopper kits come complete with a tire already installed so you can get going quickly. That said, our awesome tires might not be the best fit for you bike or your style.
No problem, swapping out the tire to meet your needs or match your other wheel is super easy. Our rims can fit a wide variety of tires, everything from skinny road tires(25 mm minimum) to big 2.2" mountain tires.
For instructions check out the following video:
Yes, all Hilltopper wheels are disc brake compatible with standard spacing and 6-bolt rotor attachment.
All of our wheels are also rim brake compatible giving you the most options to fit your bike!
For instructions on how to install a rotor on your new Hilltopper, check out the following video:
The 36 V HillTopper electric bike conversion kit is a step up from our original systems both in tech and performance. The bigger motor offers more power while the Horizon battery give you more miles on the road and the new throttle offers a bit more control.
Here are the basic steps you'll need to follow:
For more detailed instructions, check out the booklet that came with your kit or for digital downloadable PDF, click Here for 2020+ Horizon Kits, click Here for Ranger kits, or click Here for the new 2020+ Sprinter Kit.
Check out the link below for video installation instructions of the 2020 Sprinter kit.
The 24 V Hilltopper electric bike conversion kit is our flagship model, the one that stated it all. We've refined it over the years, but the core principle remains the same; Simplicity. And that's exactly what you'll find here. No bells and whistles, just what you need, this keeps you bike clean and installation a breeze.
There are five simple steps to installation:
For more detailed instructions, check out the booklet that came with your kit or download the PDF by clicking here.
These basic principles apply to all of our24V kits from 2019 and prior.
For information on storing you battery, please hop over to FAQ When Should I Charge My Battery?
You can charge your Hilltopper whenever you like! All of our batteries are smart batteries with no memory affect, so there is no need to drain it fully before recharging like you would with older battery types like NiCad or others.
Generally we suggest simply charging it after every ride, or at the end of the day if you are a regular commuter. That way you always know your battery is ready to go when you are.
If you are putting the bike away for the winter or just know you won't use it for some time, we suggest charging it fully first and storing it in doors. For the absolute best life of your battery we would also suggest plugging it back into the charger every month or so to keep it topped up. Before you ask, no, unfortunately we cannot suggest simply leaving the battery plugged into the charger long term.
For all of our electric bikes and conversion kits we've made sure charging is easy as can be. Just a few simple steps:
That's it! Follow these steps and you can rest assured you'll be ready to roll!
36V 2020 Sprinter battery has 10 - 20+ miles of range.
36V Universal Battery Replacement has 20 - 25+ miles of range.
36V 2020 Horizon battery has 25 - 50+ miles of range.
48V Summit battery has 25 - 40+ miles of range.
Mileage rates are based on a 170 pound rider on a 30 pound bike on a flat paved surface, with no wind, using the motor and not pedaling. Your mileage may vary, though most people get more than advertised mileage. For the best possible mileage we suggest pedaling anytime the motor is engaged.
All Hilltopper electric bikes and kits have a maximum speed of 20 mph. This keeps them street legal and compliant with state laws and city ordinances in the US.
For choosing a power system, here's what to keep in mind:
The 36v, 350 watt kits (Horizon) can go 20 mph with minimal pedaling. This is great for steeper hills, faster commutes & carrying bigger loads.
The 36v, 250 watt kits (Sprinter) can go 15 mph with minimal pedaling on flat ground, but they perform best as a boost to your pedaling with pedaling required on hills. Perfect if you are looking for an added boost to your ride at an affordable price. Cuts your commute time by 25%, gives a boost up hills & puts a smile on your face.
Mileage rates are based on a 170 pound rider on a 30 pound bike on a flat paved surface, with no wind, using the motor and not pedaling. Your mileage may vary, though most people get more than advertised mileage. For the best possible mileage we suggest pedaling anytime the motor is engaged.
For all of our electric bikes and conversion kits we've made sure charging is easy as can be. Just a few simple steps:
That's it! Follow these steps and you can rest assured you'll be ready to roll!
Hilltopper kits are hand built in batches by our team of craftspeople, and each kit is rigorously tested before leaving our shop.
For full kit purchases and any purchases containing a battery, please expect 7 - 14 business days for our team to build, test, and ship your kit.
For smaller items, such as accessories or components, please expect 1 - 3 business days for our team to process and ship your items.
For more detailed information, please check the product page of each kit for the latest updates regarding availability or email us at support@hilltopperbikes.com.
You read that right, free shipping* on all orders!
(*Applies only to orders in the contiguous 48 states.)
If you are unsatisfied for any reason with any of our products you can return it for a refund up to 30 days after purchase.
Please contact support@hilltopperbikes.com to initiate a return.
Return address:
Please be sure to include a note with your items that has your name, email address, phone number, order number, and why you are returning it. Without this information, we are unable to process your return.
Hilltopper Bikes
Technical Support Team Attn: (Order Number)
225 S Lucile St.
Seattle, WA 98108
USA
We stand behind the quality of our products:
Please contact support@HilltopperBikes.com to initiate a return.
Return address:
Please be sure to include a note with your items that has your name, email address, phone number, order number, and why you are returning it. Without this information, we are unable to process your return.
Hilltopper Bikes
Technical Support Team Attn: (Order Number)
225 S Lucile St.
Seattle, WA 98108
USA
Looking to find out if your kit is compatible with our Universal Replacement Battery set up? Click the link below to view our compatibility cheat sheet!
Hilltopper URB Compatibility Cheat Sheet
If you have any further questions, please contact Support@HilltopperBikes.com.
Having trouble with your PAS sensor? Wondering if it will fit your bike before you place an order? To dot your i's and dash your t's, click the link below for a detailed over view of our PAS sensor.
Video Instructions - Installing the Pedal Assist System
Our 36V Horizon kits and our 48V Summit kits both include the PAS as a fully optional component. For complete Horizon installation instructions check the next link:
Horizon Kit installation instructions ver 2021A
For complete Summit installation instructions click below:
Our variable speed throttle is just one piece of our kits that allows the rider to control the amount of power fed to the motor - kind of like a gas pedal!
The throttle is a versatile piece that can be installed on your handlebars and adjusted to whatever suits you and your bicycle best. We recommend putting the throttle on the left, placing them between the handlebar grip and the brake/shifter levers.
The most common type of handlebars on the market today would be a flat or riser handlebar. Our throttle is specifically made to match these handlebars with its 22.2mm grip diameter.
While the throttle grip is too small to fit most road bikes, drop bars, and any other handlebars with uncommon geometries, there is a pretty simple workaround - a handle bob (a quick Google search should get you plenty of result) can be attached to any of these handlebars for a quick and easy install.
Check out our video on how to install the variable speed throttle!
All HillTopper kits come complete with a tire already installed so you can get going quickly. That said, our awesome tires might not be the best fit for you bike or your style.
No problem, swapping out the tire to meet your needs or match your other wheel is super easy. Our rims can fit a wide variety of tires, everything from skinny road tires(25 mm minimum) to big 2.2" mountain tires.
For instructions check out the following video:
Yes, all Hilltopper wheels are disc brake compatible with standard spacing and 6-bolt rotor attachment.
All of our wheels are also rim brake compatible giving you the most options to fit your bike!
For instructions on how to install a rotor on your new Hilltopper, check out the following video:
There are many different types of bicycles and adult tricycles in the world today, but each Hilltopper conversion kit has been carefully designed to fit as many of these models as possible. All Hilltopper wheels are designed to be compatible with both rim brakes and disc brakes.
There are a few more factors used to confirm that the Hilltopper will fit your bike. 1) Wheel Size. 2) Hub and Fork spacing. 3) Fork Dropout Type. See FAQ Will It Fit My Bike? for more information.
The type of drop out your bike has is very important. The dropout is the place at the end of your fork where the wheel attaches to the rest of the bike.
For the longest time there was really only one type available; the "open" or "slotted" type. This is the familiar U shape you have likely seen on most every bike you can remember. Your bike must have this type for our electric bike conversion kits to fit. All conversion kit axles have a width of 10mm.
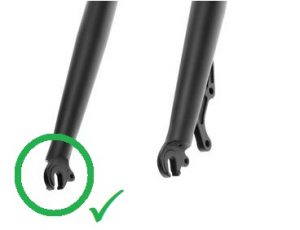
Another type of dropout that is found on a small number of high-end bikes is the "closed" dropout. This is for use only with "thru-axle" hubs, and our e-bike motors are unfortunately not compatible.

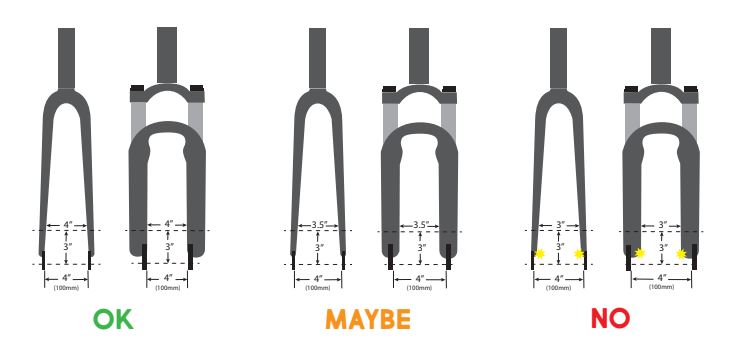
Our hubs have a 100 mm(or about 3.9 inches) axle, which is standard for most bikes. To confirm that our electric bike hub will fit into the fork on your bike we need to check the spacing of "the fork." The fork is the two metal arms that hold either side of your front wheel. If there is about 3.9" (100mm) the Hill Topper should fit great!
Since our electric bike motors tend to be a bit taller than the average bike hub, there is another fork spacing consideration to look for. Most bike hubs are only about 2-3" in diameter, but an e-bike motor can be up to 7" tall. As such, we need to ensure that the 4" spacing mentioned above does not diminish too quickly above the dropout. For the best possible fit, that 100mm/4" spacing should be maintained at least 3" above the dropout.
If you find your measurements fall within the “Maybe” category, the best way to find out if it fits is to simply try and install! Thankfully we offer free and easy returns, so if it doesn’t work out, you can always return the kit! See our “Warranty, Returns & Shipping” section for more details.
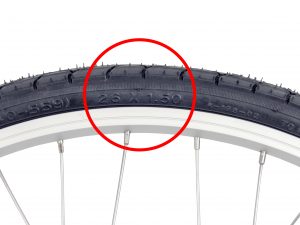
We offer all of the most common wheel sizes on the market today, including; 700c/29", 27.5", 26", 24", and 20" wheels.
You can find your wheel size printed on the side of the tire on your existing wheel.
Please note:

$10
$50
$9

Great product. Easy to install.